Creating and Managing Dynamic Pages
Create Dynamic Pages
NOTE: For more information on limitations, see Collections.
A Dynamic Page is connected to a content collection and used to generate multiple pages with unique content but the same design. You can either create a new Dynamic Page, convert an existing page to a Dynamic Page, or use a predefined Dynamic Page that is already included in the platform.
Users can add a dynamic page that is automatically connected to an Internal Collection with default content through Pages and Popups. For more information, see Pages and Popups.
- If you select the default Internal Collection (the same name as the page), everything is connected and you just have to edit the content. If you change the field names, it will disconnect them from the widgets, and must be reconnected.
- If you select another collection, you must connect your widgets to the collection fields.
NOTES:
- You must have a content collection before you can create or convert a Dynamic Page. For more information, see Define a Collection for Dynamic Pages.
- Multilingual sites, and Site Comments are not supported with Dynamic Pages.
- You cannot select a Dynamic Page or Page Item from the link picker or the Navigation widget.
Create New Dynamic Pages
- In the left panel, click Pages, and then click + New Page.
- Select Dynamic Page.
- If you do not have a collection, you will be prompted to create one.
- Type a Page Name.
- Select the collection you want to connect to from the drop down.
- Click Add Page.
After creating a Dynamic Page, the next step is to connect your widgets (see below).
Convert an Existing Page to a Dynamic Page
- In the left panel, click Pages, click the Page Settings () icon next to the page you want to convert, and click Convert to Dynamic Page.
- Select the collection from the drop down.
- Click Done.
After converting a Dynamic Page, the next step is to connect your widgets (see below).
NOTES:
- Dynamic Pages appear on in the Pages Panel with a collection icon to indicate it is a Dynamic Page. To see the name of the collection the page is connected to, hover over the icon.
- Dynamic Pages do NOT appear in the site navigation, and thus are hidden by default. See Add a List to Display Dynamic Pages below for more information on how to provide navigation to your Dynamic Pages.
Dynamic Page Permissions
Dynamic Pages do not have special permissions. The data is handled externally (except in the case of internal collections), so if a client has access to the data in the collection they will be able to change it. Also, the data is not backed up in anyway.
Clients with limited editing permissions will not be able to change anything that is connected in the Dynamic Page—they are only able to view it.
Dynamic Page Navigation
Once a Dynamic Page is created or an existing page is converted, by default it will not appear in the navigation and the URL will not be indexed. This is because it does not have any content; it only functions as a layout. This also means the Dynamic Page and the page items will not be available in the link picker.
To add the dynamic page to the navigation:
- In the side panel, click Pages, and click the settings icon next to the dynamic page you want to add to the navigation. For more information, see Pages and Popups.
- Click Hide/Show in Navigation, and then select Show on all.
- In the Add to Navigation popup:
- Select a parent navigation page from the Add page items as subpages of dropdown.
- Select a Field to display in navigation from the dropdown.
- Click Save Details.
NOTE:
- Each parent navigation page may only contain information from one dynamic page. That is, multiple dynamic pages may not be linked to a single parent navigation page. Additionally, you may have up to 150 page items. However, it is not recommended you reach this limit.
- If a navigation item contains a dynamic page and a regular page, the dynamic page items will always be displayed last, regardless of the order of the actions.
You can also add a list to display dynamic pages and provide navigation. For information, see Add Lists to Display Dynamic Pages below.
Dynamic Page Settings
In the Dynamic Page Settings you can change the collection and URL of the page, turn on or off page indexing, add SEO data by connecting the title and description fields to the collection, and add custom Header HTML.
After creating or converting the Dynamic Page, the next step is to connect your widgets (see below).
Connect Your Dynamic Page Widgets
After creating a Dynamic Page, the next step is to connect your widgets and each element on the page to fields in the collection. To see a list of supported widgets and data types, see Connected Data.
NOTE: The Video widget is only available in Dynamic Pages. Multi-location and Social widgets are only available in Connected Data.
To connect a widget:
- Right-click on the widget you want to connect, and select Connect to Data.
- Select the field from your collection using the drop down (only relevant fields are shown).
- Select Done.
The Connected Data icon () appears on the widget indicating that it is connected.
Warning: If you convert a Dynamic Page to a regular page, all connected widgets will disconnect, requiring you to reconnect them if you convert it back into a Dynamic Page.
Change Collections
In Dynamic Page Settings you can change the collection. When you do this, page widgets will stay connected to field names/labels that exist in both collections.
For example, if you have a collection with fields named name, address and phone and you change to a collection with fields named address and phone, the widgets connected to address and phone will remain connected and display the data from the new collection, while the widget connected to name will be disconnected because it does not exist in the new collection.
Connect Custom Widgets
Custom widgets that support Connected Data can also be connected. Make sure Enable binding to Connected Data is toggled on for any custom widget you want to connect for Dynamic Pages.
The final step is to add a List, Gallery or Image Slider widget to your site so users can navigate to the Dynamic Pages. For more information, see Add Lists to Display Dynamic Pages below.
Add Lists to Display Dynamic Pages
The final step in creating Dynamic Pages is to create a list of links to navigate to the different pages. This is done by adding a List widget and connecting it to your Dynamic Page.
To connect a List widget to your Dynamic Page:
- Add the List widget to the page of your site on which you want it to exist. For more information, see Add Widgets.
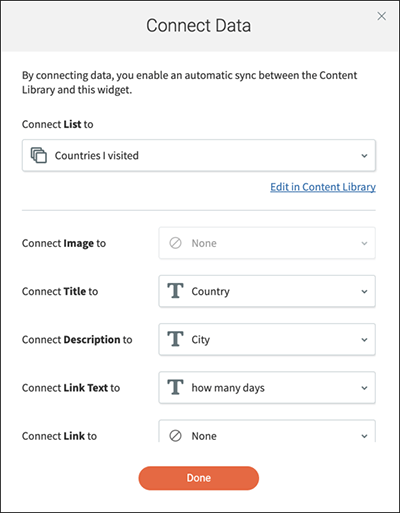
- Right-click on the List widget to open the settings menu, and click Connect to Data.
- Select the collection from the Connect List to menu.
- Map the fields in the collection to the elements in the List widget you want to display.
- Under Connect Link to select the dynamic page. This is what creates the link between the List widget and your Dynamic Pages.
- Click Done.