
Adding and Arranging Content
The CCH Web Manager editor is built from a header, footer, rows, and columns.
Content can be added to your website using
widgets, the most common of which are the Text Widget and Image Widget. Widgets sit within the content area via
rows
and
columns.
Widgets
Most content in your website is added and edited within a ‘widget’. To edit an existing area of content, click on it to see the editing options. The most common widgets are the Text Widget and Image Widget. To find more information on widgets please click here.
To add widgets to your site:
- In the left panel, click Widgets.
- Search for the widget you want, and then drag and drop it into your site.
To delete a widget from your site, right-click anywhere on the widget to open the context menu, and then click Delete. Alternatively, click the red X at the top right corner of the widget.
To arrange widgets side by side, drag a widget onto your site, add a column to the row where that widget has been placed, and then drag another widget into that column. Alternatively, drag the two-column widget onto your site and then drag and drop the widgets into each column.
To learn more about adding and editing widgets, please click here.
Widgets often take up the full size of a column or row, making it difficult to select them. To get around this, right-click the widget in the column or row you want to select, hover over the
Select Container option, and then select either
Column
or
Row.
Rows
Rows are the horizontal sections of your site. When you add widgets and columns to your site, they are placed within these rows. To change how content is displayed in the mobile view, click the reverse column order toggle in the row editor.
You can add rows to your site by dragging widgets into the site. When you drag a widget between rows or into a space where want to add a row, a new row will be created when you drop the widget.
To delete a row, right-click anywhere on the row to open the context menu, and then click Delete. Alternatively, click the Row button at the top left corner of the row and click Delete.
Columns
Every row contains at least one column. Columns contain all the widgets in your site and control their arrangement.
Every row can contain up to four columns. Whenever you add a new column, it appears alongside the existing column in that row.
Note
- While desktop and tablet views allow each row to hold up to four columns, mobile websites can only show at most two columns in a row.
- Columns added in desktop or tablet views will assume the full width of the page when switched to mobile view; to create a row with two columns in the mobile view, first switch to mobile view, then add a two-column widget.
To delete a column, right-click anywhere on the column to open the context menu, and then click Delete. Alternatively, click the red X at the top right corner of the column.
You can place widget directly into columns, or structure the column further by adding inner rows.
Inner Rows
Inner rows allow extra design flexibility by enabling you to add rows inside columns. With the help of inner rows, you can vary the column layout and keep the general design of the row (for example, background, spacing, bleed).
Just like regular rows, inner rows can have their own background and spacing, be split into up to four columns, and have their column order changed on mobile. Columns in inner rows can be populated by any widget, but inner rows cannot be added to such columns.
To add an inner row to a column, do one of the following:
- Right-click the row, and click Add Inner Row. If there are multiple columns in the row, choose to which column you want to add the inner rows.
- Right-click the column, and click Add Inner Row.
- Right-click the inner row, and click Add Row to place an inner row below the current one.
Inner Row Example:
To give an example of how to use inner row, let’s look at two ways a layout that contains a title and 3 buttons can be designed:
- Add two rows. Place the Title in Row 1 with 1 Column. Split Row 2 into 3 columns. Place a button into each column.
- Two separate rows cannot share the same background image and you need to set spacing and bleed style separately for each row.
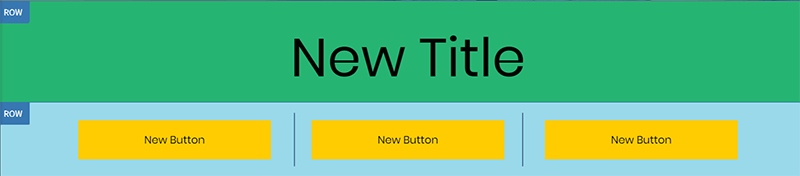
- Add a row. By default, each row contains a column. Add 2 inner rows to the column. Place the Title into inner row 1. Split inner row 2 into 3 columns. Place a button in each column.
- These two inner rows will share the main row background, spacing and bleed.

Some important considerations when it comes to editing inner rows:
- You can only use the order switching arrows to switch the order between inner rows. To switch the order of widgets and inner rows, you need to manually drag and drop the widgets above or below the inner row.
- 2 columns, 3 columns, 4 columns widgets cannot be placed in inner rows. To add a column, right-click the row and click Add Column.
- Unlike regular row, inner rows cannot be copy-pasted.
TIP: Show Hidden Elements
At any time, you can see all of the hidden widgets on a page by clicking the Unhide Elements icon at the bottom of the left panel under Settings.
NOTE: The Unhide Elements icon only displays if you have hidden elements in your site.
To unhide elements:
- Click the hidden element in the editor.
- In the left panel, click Unhide Element. Hidden elements are now displayed.
- Once hidden elements are displayed, to restore them, click on the element, and then click Yes on the message.
NOTE: If you are using the unhide element feature and it does not reveal an image on your site, your image might need to be added and uploaded.
Snap to Align
While resizing widgets within the same column, Website Builder attempts to Snap to Align them to be the exact same size. As you resize, Website Builder jumps ahead or behind to snap to location. This should make it easier to make widgets the exact same size.
Snap to Grid
The Snap to Grid feature helps lay widgets in the pages of your site with professional precision. This system allows you to align widgets horizontally and vertically within columns and rows. Rulers are presented when moving an element in its row or column, or when resizing the widget. The aligned elements are marked with a colored border. A widget may be aligned with more than one other widget, depending on the specific use case.
Note: Alignment is supported in the views of the three different devices (desktop, tablet, mobile).
For more information about adding and editing widgets, see Add Widgets and Edit Widgets.
Copy and Paste
Creating a site takes time and dedication. You can make this process easier and more efficient by using the Copy and Paste feature. Copy elements and rows in your site, creating exact duplicates in order to create identical rows or elements for your site.
You can copy and paste using keyboard shortcuts. To copy, use CTRL+C (Command+C on Mac). To paste, use CTRL+V (Command+V on Mac).
Note: You cannot copy and paste widgets or pages between sites.
To copy and paste widgets:
- Right-click a widget, and click Copy.
- Right-click the area you want to paste and click Paste to insert the widget into the row. The duplicate widget appears above the currently selected widget.
To copy and paste a column:
- Right-click to open the column, and click Copy.
- Open the Row menu to paste the column into a row. You can paste the column into any row on your site, including the header or footer. Please be advised that you can only paste up to four columns into any one row.